Day 18….Are we there yet?
………Far from it.
Now that I have developed and programmed the basis of the game, it’s time to refine, refine, and refine even more.
But before I get into all that refining, I wanted to share a short bit about Player Damage Visualization. Essentially, the thrusters/engines (I will use interchangeably in this tidbit) are coded similar to the rest of the GameObjects, i.e. lasers, already inputted in my game. I dragged the thruster sprites into the Player, scaled to my liking, placed the thruster sprite above the ship asset by switching the sorting layer to foreground and placed it’s order forward. Next, I named the sprites and for my needs, right and left engine and set the duplicate sprite accordingly. From there I opened the Player C# Script and under the damage logic, I created the thrusters existence code and its’ role in the game.

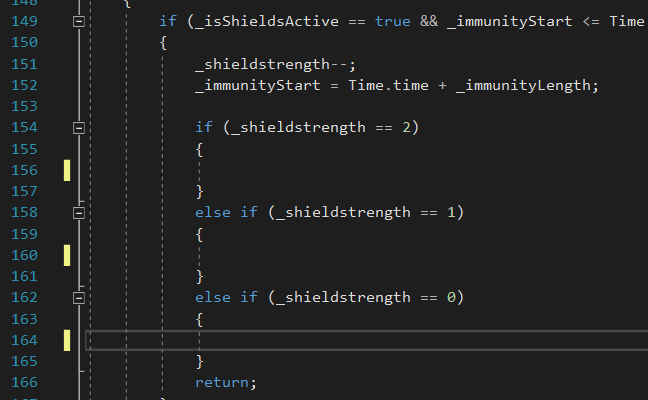
Like the rest of my gameObjects, I used if() statements. First off, I wanted the thrusters existence known, so to do so, I created variables: private GameObject _rightEngine; private GameObject _leftEngine; — if you are creating 2 variables that are similar you can use a comma instead of 2 separate variables i.e. private GameObject _rightEngine; , _leftEngine; The use of a comma is equivalent to writing private GameObject, but is not to be used all the time. Then like with most of nthe variables I serializeField to be able to view in the inspector. Once the thrusters’ existence is made, I assigned each one in it’s respective slot. From here, I went on to code its’ role, show damage to the player when it interacts with the enemy. Under the Damage Method, I used the following codes (see above).
Next step in process is to animate. So like with everything else, that is done in the Animator — Choose object to animate > new animation > name > drag sprites to animator. For the duplicate, add animator component and assign the new animation created > SAVE > RUN.
Now time for the refining: Post Processing. Is it just me or has anyone else in the program experienced set back after set back?…..Well today was without exception. For the lucky folks, because no one else has raised the same concerns on Slack, Post Processing was readily available for installation in the Package Manager: Unity -> Window > Package Manager > All Packages > select post processing > Install.
Simple. Fast. No screaming at the hypothetical Unity tech.
If that doesn’t work for you like it didn’t for me I figured out a way to get it installed. On the Unity Manual, Installation | Post Processing | 3.0.1 (unity3d.com), I click on the source code hyperlink. This took me the the GitHub webpage for Post Processing. Now from here, I clicked on the green code button > Open with GitHub Desktop. From there it will prompt you to download the desktop app. Once Git Hub desktop app is open, go back to the GitHub site and download code:

- Under clone, copy and paste the https url
- Go back to Git Hub desktop app > File > Clone Repository
- Once files are downloaded > go to Unity Package Manager
- Add + (red) > Add from DISK >Documents > GitHub > Post Processing > package.json > ADD

- Choose In Project > refresh drop list (yellow) > click Post Processing > Install (located on right corner of window)
Close package manager. Under packages, post processing should be available to use. That seemed easy right? Well no it wasn’t. Here are a list of my bloopers:
- Trying to add the Post Processing package via git URL using the source code hyperlink — idiot.
- Trying to just use the https URL from the GitHub site to add Post Processing via git URL — ‘wrong, wrong, wrong’…… — Barney Stinson
- Downloading the zip file of the Post Processing files from GitHub before installing the desktop app, then trying to add them via Add from DISK.
Applying Post Processing Effects
What the heckers is Post Processing? Short answer — Photoshop for game development. Here is a rundown of how to do so: Create a post processing profile > create game object > empty object > Post_Process_Volume — this will control effects of the game > Add component > Post_Process_Volume script > is global check marked so entire environment and camera and everything viewed is affected. Then go to Profile > new, which will auto attach under scenes > post process volume profile > under Hierarchy > Post_Process_Volume game object > add effect > Unity > choose any type of effects setting you need.
Bloom — takes mission data from materials and enhance them. To be able to render volume effects: Main camera > add component > post process layer — define a layer to apply post process effects > under the Post_Process_Volume game object> layer >add layer: “post processing” > back on the Main Camera game object> layer = post processing> Post Process Volume layer = post processing. Bloom effects will now take place
Color Grading: Post Process Volume game object > add effect> color grading > mode — for my purposes, I want HDR, noticed a error underneath where it told me to switch to linear color grading mode >to change go to file > build settings > player settings > color space = linear. Under this tool I am able to adjust color, warmth, saturation, etc…
Within the Post Processing package, you are able to add effects as desired. For the remainder of my day, I played around with the various tools to include my personal touches to my game.